Web Console
The web console is integrated in the RustDesk server Pro, serviced by the 21114 port.
Features:
- Browse devices
- Add/modify users and user groups
- Modify device access permissions
- Browse device connection logs and the other logs
- Update settings
- Manage client settings sync strategies
- Manage shared address books
- Generate custom client build
Log in
The default port of the web console is 21114. Enter http://<server ip>:21114 in the browser to enter the console page, as shown in the following figure. The default administrator username/password is admin/test1234:
If you need HTTPS support, please install a web server such as Nginx or use IIS for Windows.
After logging in please be sure to change the password, select Settings in the account menu in the upper right corner to enter the password modification page, as shown in the following figure. You can also create another administrator account and delete this one. You’d better enable email login verification.
Non-administrator users can also login to browse their device and logs, change their user settings.
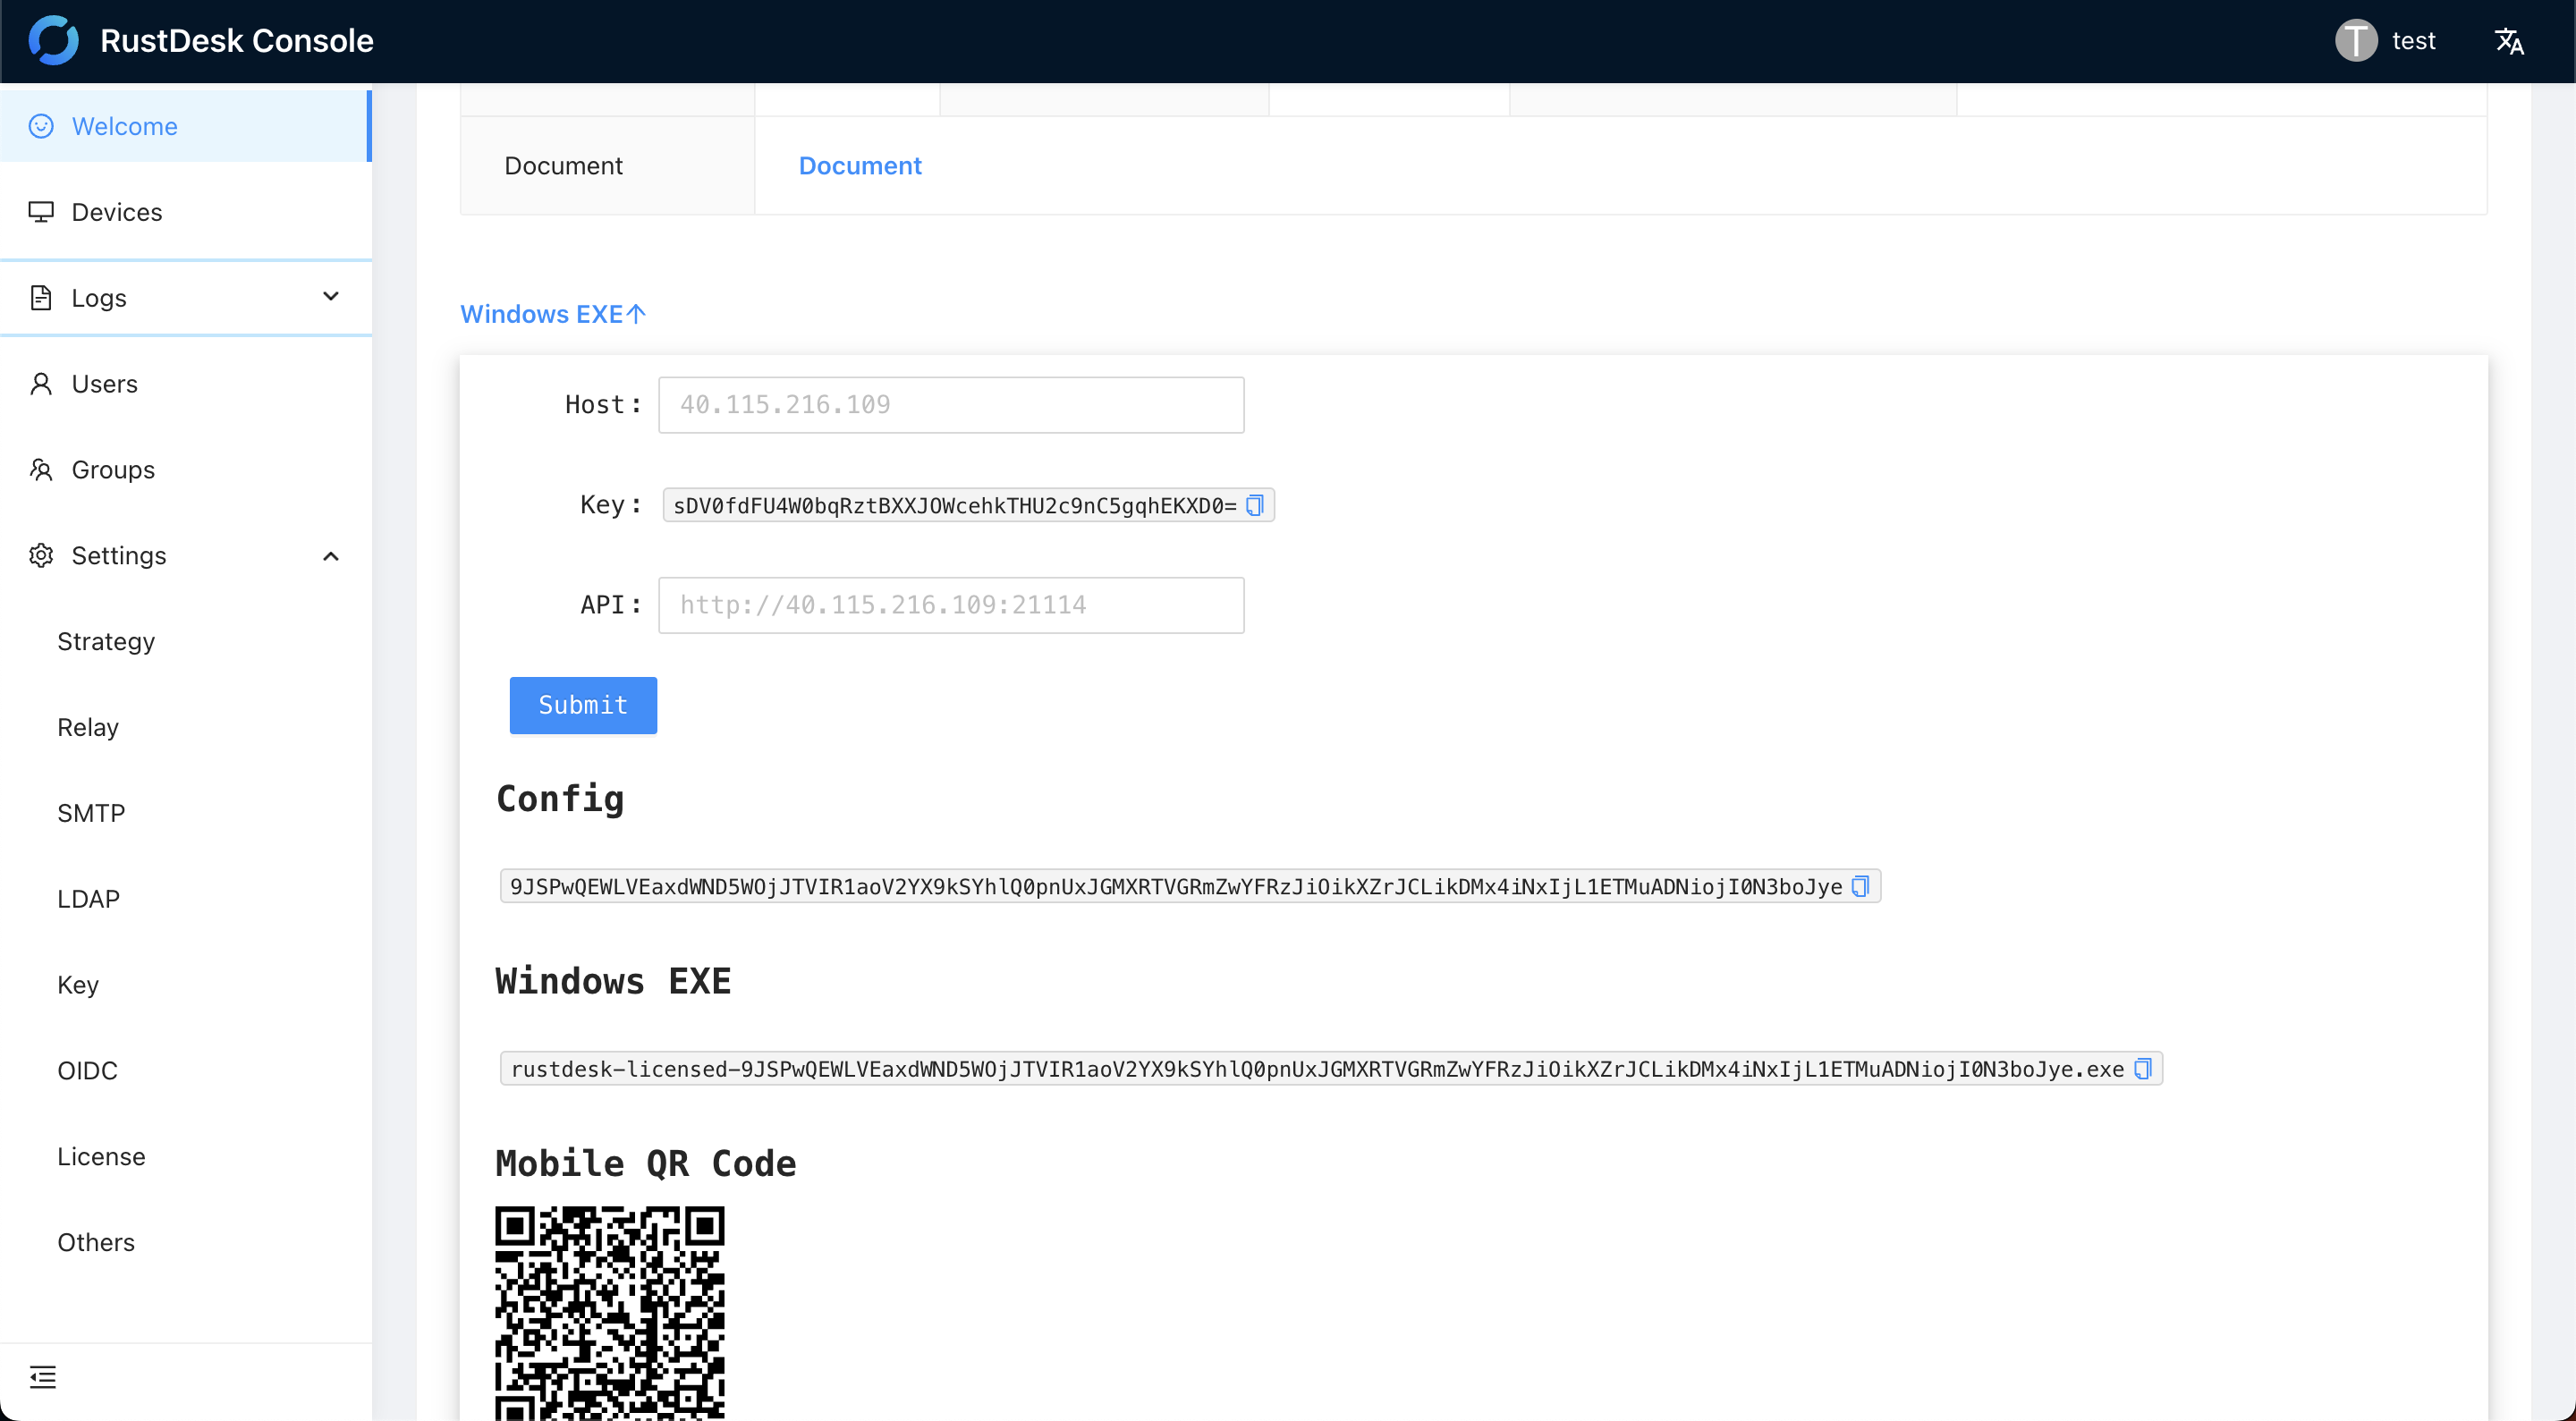
Automatic Configs
By Clicking on Windows EXE you will be able to get the configs for your own RustDesk Server Pro, this will help configure your clients.
For Windows clients, you can leave out the custom server configuration and put the configuration information in the rustdesk.exe filename instead. As shown above, please go to the console welcome page and click on Windows EXE. Client ≥ 1.1.9 required.
You can use this in conjunction with client config and deployment scripts to setup your clients.
Creating a new user other than the default admin user
Note
Individual plan does not have this feature.- Click on
Userson the left hand menu. - Create another account with
administratorenabled. - Log in with the new administrative account.
- Delete the
adminonUserspage.
Creating a new user
- Click on
Userson the left hand menu. - Create a new user.
- Select what group they should be in (if you need to add new groups please keep reading).
Add a new Group
- Click on
Groupson the left hand menu. - Create a new group.
- Once created you can allow groups access each other, Click
Edit. - Select the relevant groups you want access (it automatically adds them in the corresponding group).
Setting up multiple relay servers
- Go to
Settingson the left hand menu. - Click on
Relayon the submenu. - Click
+next toRelay Servers. - Enter the Relay server DNS address or IP address in the box which now shows and press Enter.
- If you have more than one Relay server you can keep clicking
+and adapt the Geo settings is required (remember and copy your key to the other servers).
Set or change the license
- Go to
Settingson the left hand menu. - Click on
Licenseon the submenu. - Click
Editand paste in your license code. - Click
OK.
Viewing Logs
On the left hand side click on Logs.
Setup Emails
Gmail in this example
- Go to
Settingson the left hand menu. - Click on
SMTPon the submenu. - Enter the SMTP address
smtp.gmail.com. - Enter the Port 587 in
SMTP Port. - Enter the Gmail account i.e.
myrustdeskserver@gmail.cominMail Account. - Enter your password (you might need an app password).
- Enter your Gmail account i.e.
myrustdeskserver@gmail.cominFrom. - Click
Checkto save.
Assign Device Users/Strategies/Device Groups to Devices via Web Console
The User is the RustDesk User logged in on the device or assigned to the device by clicking Edit next to the device, click in the User box and drop-down to select your user.
You can also batch assign devices to a user by clicking More → Assign Devices in the User List.
To add a device to a device group, you can click Edit next to the device in the Device List and change the Group, or go to the Device Groups list, click on a device group name, and adjust the devices within that group.
To assign a strategy to a device, hover over the right side of the Strategy list and click Edit Devices, Edit Users, or Edit Device Groups in the menu to add the corresponding devices, user devices, or device group devices to the selected strategy.
API Token
You must first go to Settings → Tokens → Create and create a token with the required permissions: Device, Audit Log, User, Group, Strategy, Address Book.
Once created, you can use these tokens via command line or Python CLI to perform actions with the corresponding permissions.
Assign via Token from Command Line
You can also perform assignments using the RustDesk executable with the --assign parameter.
This allows assigning users, strategies, address books, or device groups to a device directly from the command line.
Example:
"C:\Program Files\RustDesk\rustdesk.exe" --assign --token <generatedtoken> --user_name <username>Supported Parameters
| Parameter | Description | RustDesk Server Pro | RustDesk Client | |
|---|---|---|---|---|
--user_name <username> | Assign a user to the device | |||
--strategy_name <strategyname> | Assign a strategy to the device | |||
--address_book_name <addressbookname> | Assign device to an address book | |||
--address_book_tag <addressbooktag> | Assign with address book tag | |||
--address_book_alias <alias> | Assign with address book alias | 1.5.8 | 1.4.1 | |
--address_book_password <password> | Set password for the address book entry | 1.6.6 | 1.4.3 | |
--address_book_note <note> | Set note for the address book entry | 1.6.6 | 1.4.3 | |
--device_group_name <devicegroupname> | Assign device to a device group | |||
--note <note> | Add note to the device | 1.6.6 | 1.4.3 | |
--device_username <device_username> | Set the device username | 1.6.6 | 1.4.3 | |
--device_name <device_name> | Set the device name | 1.6.6 | 1.4.3 |
The command line on Windows does not have output by default. To get output, please run like this, "C:\Program Files\RustDesk\rustdesk.exe" <arg1> <arg2> ... | more or "C:\Program Files\RustDesk\rustdesk.exe" <arg1> <arg2> ... | Out-String, see here.
Python CLI Management Tools
Users Management (users.py)
Show help:./users.py -h
View users:./users.py --url <url> --token <token> view [--name <username>] [--group_name <group_name>]
Filters:--name: username--group_name: user group
Example:./users.py --url https://example.com --token <token> view --group_name admins
Operations:
view can be replaced with enable, disable, or delete.
Example (disable user):./users.py --url https://example.com --token <token> disable --name testuser
Devices Management (devices.py)
Show help:./devices.py -h
View devices:./devices.py --url <url> --token <token> view [--id <device_id>] [--device_name <device_name>] [--user_name <user_name>] [--group_name <group_name>] [--device_group_name <device_group_name>] [--offline_days <days>]
Filters:--id: device ID--device_name: device name--user_name: assigned user--group_name: user group--device_group_name: device group--offline_days: days offline
Example:./devices.py --url https://example.com --token <token> view --user_name mike
Operations:
view can be replaced with enable, disable, delete, or assign.
Example (assign device):./devices.py --url https://example.com --token <token> assign --device_name PC01 --assign_to user_name=mike
Address Book Management (ab.py)
Show help:./ab.py -h
View shared address books:./ab.py --url <url> --token <token> view-ab [--ab-name <address_book_name>]
Get personal address book GUID:./ab.py --url <url> --token <token> get-personal-ab
Add a shared address book:./ab.py --url <url> --token <token> add-ab --ab-name <name> [--note <note>] [--password <password>]
Update or delete a shared address book:./ab.py --url <url> --token <token> update-ab --ab-guid <guid> [--ab-update-name <new_name>] [--note <note>]./ab.py --url <url> --token <token> delete-ab --ab-guid <guid>
View peers in an address book:./ab.py --url <url> --token <token> view-peer --ab-guid <guid> [--peer-id <peer_id>] [--alias <alias>]
Add, update, or delete a peer:./ab.py --url <url> --token <token> add-peer --ab-guid <guid> --peer-id <peer_id> [--alias <alias>] [--note <note>] [--tags tag1,tag2]./ab.py --url <url> --token <token> update-peer --ab-guid <guid> --peer-id <peer_id> [--alias <alias>] [--note <note>] [--tags tag1,tag2]./ab.py --url <url> --token <token> delete-peer --ab-guid <guid> --peer-id <peer_id>
Tags management:./ab.py --url <url> --token <token> view-tag --ab-guid <guid>./ab.py --url <url> --token <token> add-tag --ab-guid <guid> --tag-name <name> [--tag-color 0xFF00FF00]./ab.py --url <url> --token <token> update-tag --ab-guid <guid> --tag-name <name> --tag-color 0xFFFF0000./ab.py --url <url> --token <token> delete-tag --ab-guid <guid> --tag-name <name>
Access rules management:./ab.py --url <url> --token <token> view-rule --ab-guid <guid>./ab.py --url <url> --token <token> add-rule --ab-guid <guid> [--rule-type user|group|everyone] [--rule-user <user>] [--rule-group <group>] --rule-permission ro|rw|full./ab.py --url <url> --token <token> update-rule --rule-guid <rule_guid> --rule-permission rw./ab.py --url <url> --token <token> delete-rule --rule-guid <rule_guid>
Example (add read-only rule for user “mike”):./ab.py --url https://example.com --token <token> add-rule --ab-guid <guid> --rule-user mike --rule-permission ro
Audits (audits.py)
Show help:./audits.py -h
View connection audits:./audits.py --url <url> --token <token> view-conn [--remote <peer_id>] [--conn-type <type>] [--page-size <n>] [--current <n>] [--created-at <"YYYY-MM-DD HH:MM:SS">] [--days-ago <n>]
View file audits:./audits.py --url <url> --token <token> view-file [--remote <peer_id>] [--page-size <n>] [--current <n>] [--created-at <"YYYY-MM-DD HH:MM:SS">] [--days-ago <n>]
View alarm audits:./audits.py --url <url> --token <token> view-alarm [--device <device_id>] [--page-size <n>] [--current <n>] [--created-at <"YYYY-MM-DD HH:MM:SS">] [--days-ago <n>]
View console audits:./audits.py --url <url> --token <token> view-console [--operator <username>] [--page-size <n>] [--current <n>] [--created-at <"YYYY-MM-DD HH:MM:SS">] [--days-ago <n>]
Filters:--remote: Peer ID (for connection or file audits)--conn-type: 0=Remote Desktop, 1=File Transfer, 2=Port Transfer, 3=View Camera, 4=Terminal--device: Device ID (for alarm audits)--operator: Operator username (for console audits)--created-at: Local time filter, e.g., “2025-09-16 14:15:57”--days-ago: Filter records newer than given days ago--page-size / --current: Pagination
Example:./audits.py --url https://example.com --token <token> view-conn --remote 123456789 --days-ago 7
Searching for a device
- Go to Devices.
- In the Device Name Search Field type in the name and click
Queryor hit Enter. - To use a wildcard add
%at the start, end or both of the search term.